The cutting edge determines the efficiency, accuracy, and cleanliness of any cut. The chipboard is usually 3/4 x 48 x 96 inches in size. If a table saw isn’t available, a circular saw can do the job. Let’s learn with A1 Plywood the steps to how to cut particle board for each type of saw!
1. Table Saw In Large Size
- Step 1: Turn off the breaker to the saw. Fit a 60-tooth slanted blade, alternately above, into the table saw. Raise the blade 1 1/4 inch in height from the top of the table to the highest tooth. Turn on the breaker.
- Step 2: Wear goggles and a mask. Place the saw blade on the exit side of the saw and on the left side to support the chipboard support.
- Step 3: Place the fence on the table saw according to the required measurements. If you are cutting long, thin strips, place the chipboard on the saw table lengthwise. If you are cutting rectangular or square panels, place the chipboard on the saw perpendicular to the length.
- Step 4: Turn on the saw. Use two hands to push the board across the blade, need another person to help you. When the chipboard is at least 6 inches from the blade, stop pushing. Turn off the saw.
- Step 5: Reset the fence to the required measurements for the panels. Repeat the cut.
- Step 6: Install a carbon-tipped, combination blade on a circular saw or radial saw. Place the long strips on the bed of the saw. Mark them with the necessary measurements. Align the blade with the mark.
2. Circular Saw S Ripple
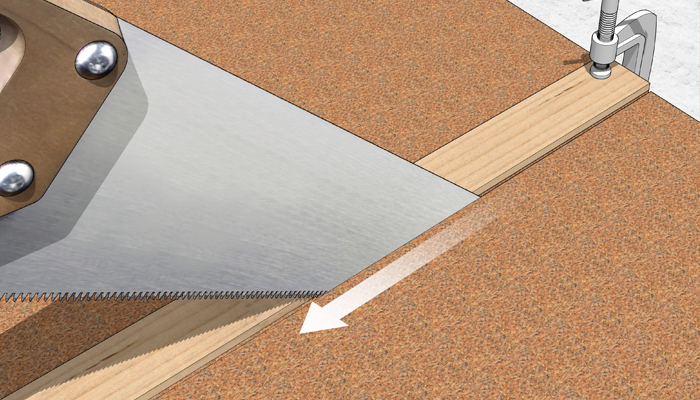
- Step 1: Install the 48-tooth combination blade on the circular saw. Set the depth of the cut to 1 inch from the base of the saw to the highest tooth.
- Step 2: Place the chipboard on the four legs of the saw table. Place clamps on the cogs to secure the board.
- Step 3: Measure the distance from the 90-degree fence or guide on the saw base to the side of the saw blade. Add distance or capacity to the guide bar to the required measurement for the cut.
- Step 4: Mark the required measurements on both sides of the board. Clip a 3/4 inch wide piece of hardwood plywood to the chipboard, aligning it on both sides with the marks.
- Step 5: Wear goggles and a mask. Stand facing the edge of the chipboard with the strip of plywood on the left side. Align the saw with the guide bar; place the edge of the saw base on the chipboard. Do not let the blade touch the chipboard.
- Step 6: Turn on the saw. Push the saw forward with your right hand, directing the saw along the plywood strip to the other side.
3. Puzzle Curve
- Step 1: Draw or use a template to draw curves or patterns on the chipboard. Clamp the board across the two boards of the saw.
- Step 2: Fit a carbon steel blade, 1/4 inch long, onto the jigsaw. Choose one specified for wood with at least 16 teeth per inch.
- Step 3: Wear a mask and goggles. Grip the saw with one hand. Place the front edge of the guide on the saw on the edge of the chipboard. Align the saw blade with the line. Turn on the saw.
- Step 4: Use your hand to push the saw forward, directing it along with the drawing in the line of sight. Apply moderate pressure down the saw.
4. Some Cutting Techniques
- The advantage is using a few simple techniques to avoid flaking and chipping edges:
Increase the cutting depth of the blade. When the blade is at maximum depth, the teeth exit the wood at a steep, nearly vertical angle and are less likely to entrain additional material. When cutting on a table saw, set the blade height to the maximum. You’ll get a cleaner edge and have an easier time controlling the board at the end of the cut. - Tape the cut lines. Use adhesive tape, which is easier to remove and less likely to be pulled out of the material. Place the tape, draw a cut line on the tape with a straight pencil and cut through the tape. The tape tends to hold the material together and prevent the saw blade from chipping.
- Instead of marking the cut with a pencil, mark the cut with a sharp knife.
- When cutting with a circular saw, the blade teeth enter the wood from the bottom and exit from the top, and the exit point is the point most likely to chip. For this reason, it is recommended that you turn the board upside down to cut, with the finished side facing down. When cutting on a table saw, the good side should face up on the table because the teeth of the blade go from the top and are cut down.
5. Frequently Asked Questions?
5.1. What blade should I use to cut particle board?
- Buy a triple chip blade or an ATB blade with a 10 or 15-degree hook.
- Make sure the board is completely supported during the whole cut – absolutely no overhang without support.
- Feed the material absolutely straight and steady against a guide.
- Keep the blade sharp. Plywood and MDF are glued together. The glue uses clay as a filler. Clay is very small rocks so it really wears saw blades.
5.2. Can I cut particle board with a saw?
There are some saws that can cut particle boards. It depends on the size of the particle board. Therefore, the user should select a suitable saw.
6. A1 Plywood – Vietnam’s leading plywood factory
A1 Plywood is committed to the prestige and quality of products, ensuring that Plywood panels are always delivered to customers according to requirements and designs.
We own a direct furniture factory in Vietnam, with a team of skilled carpenters, each product is made carefully from the stage of choosing boards to construction and installation.
The factory accepts orders to produce Plywood boards based on the correct sizes and measurements as required, and delivery on time.
Through the above article, I hope you can understand how to cut particle board panels through some common saws
Related keywords: how to cut particle board without a saw, how to cut particle board without chipping, how to cut particle board shelves, how to cut particle board with jigsaw, how to cut particle board by hand, how to cut particle board with a hand saw, how to cut particle board with a circular saw, how to cut mdf board at home.